React PhoneCat
Re-writing the AngularJS tutorial in React
Aaron O’Connell of 42floors recently documented his backbone-powered rewrite of the AngularJS PhoneCat tutorial. While I don’t support the notion of using Lines Of Code as a metric of comparison (more on that later), I found his step-by-step walkthrough quite insightful. So, without further ado, here is my own walkthrough of rewriting Angular PhoneCat in React.
Walkthrough
PhoneCat: What is it?
"PhoneCat" is a phone catalog, a client-side web app that displays a sortable, filterable list of phones. Each phone can be clicked to open up a page with details about that phone.
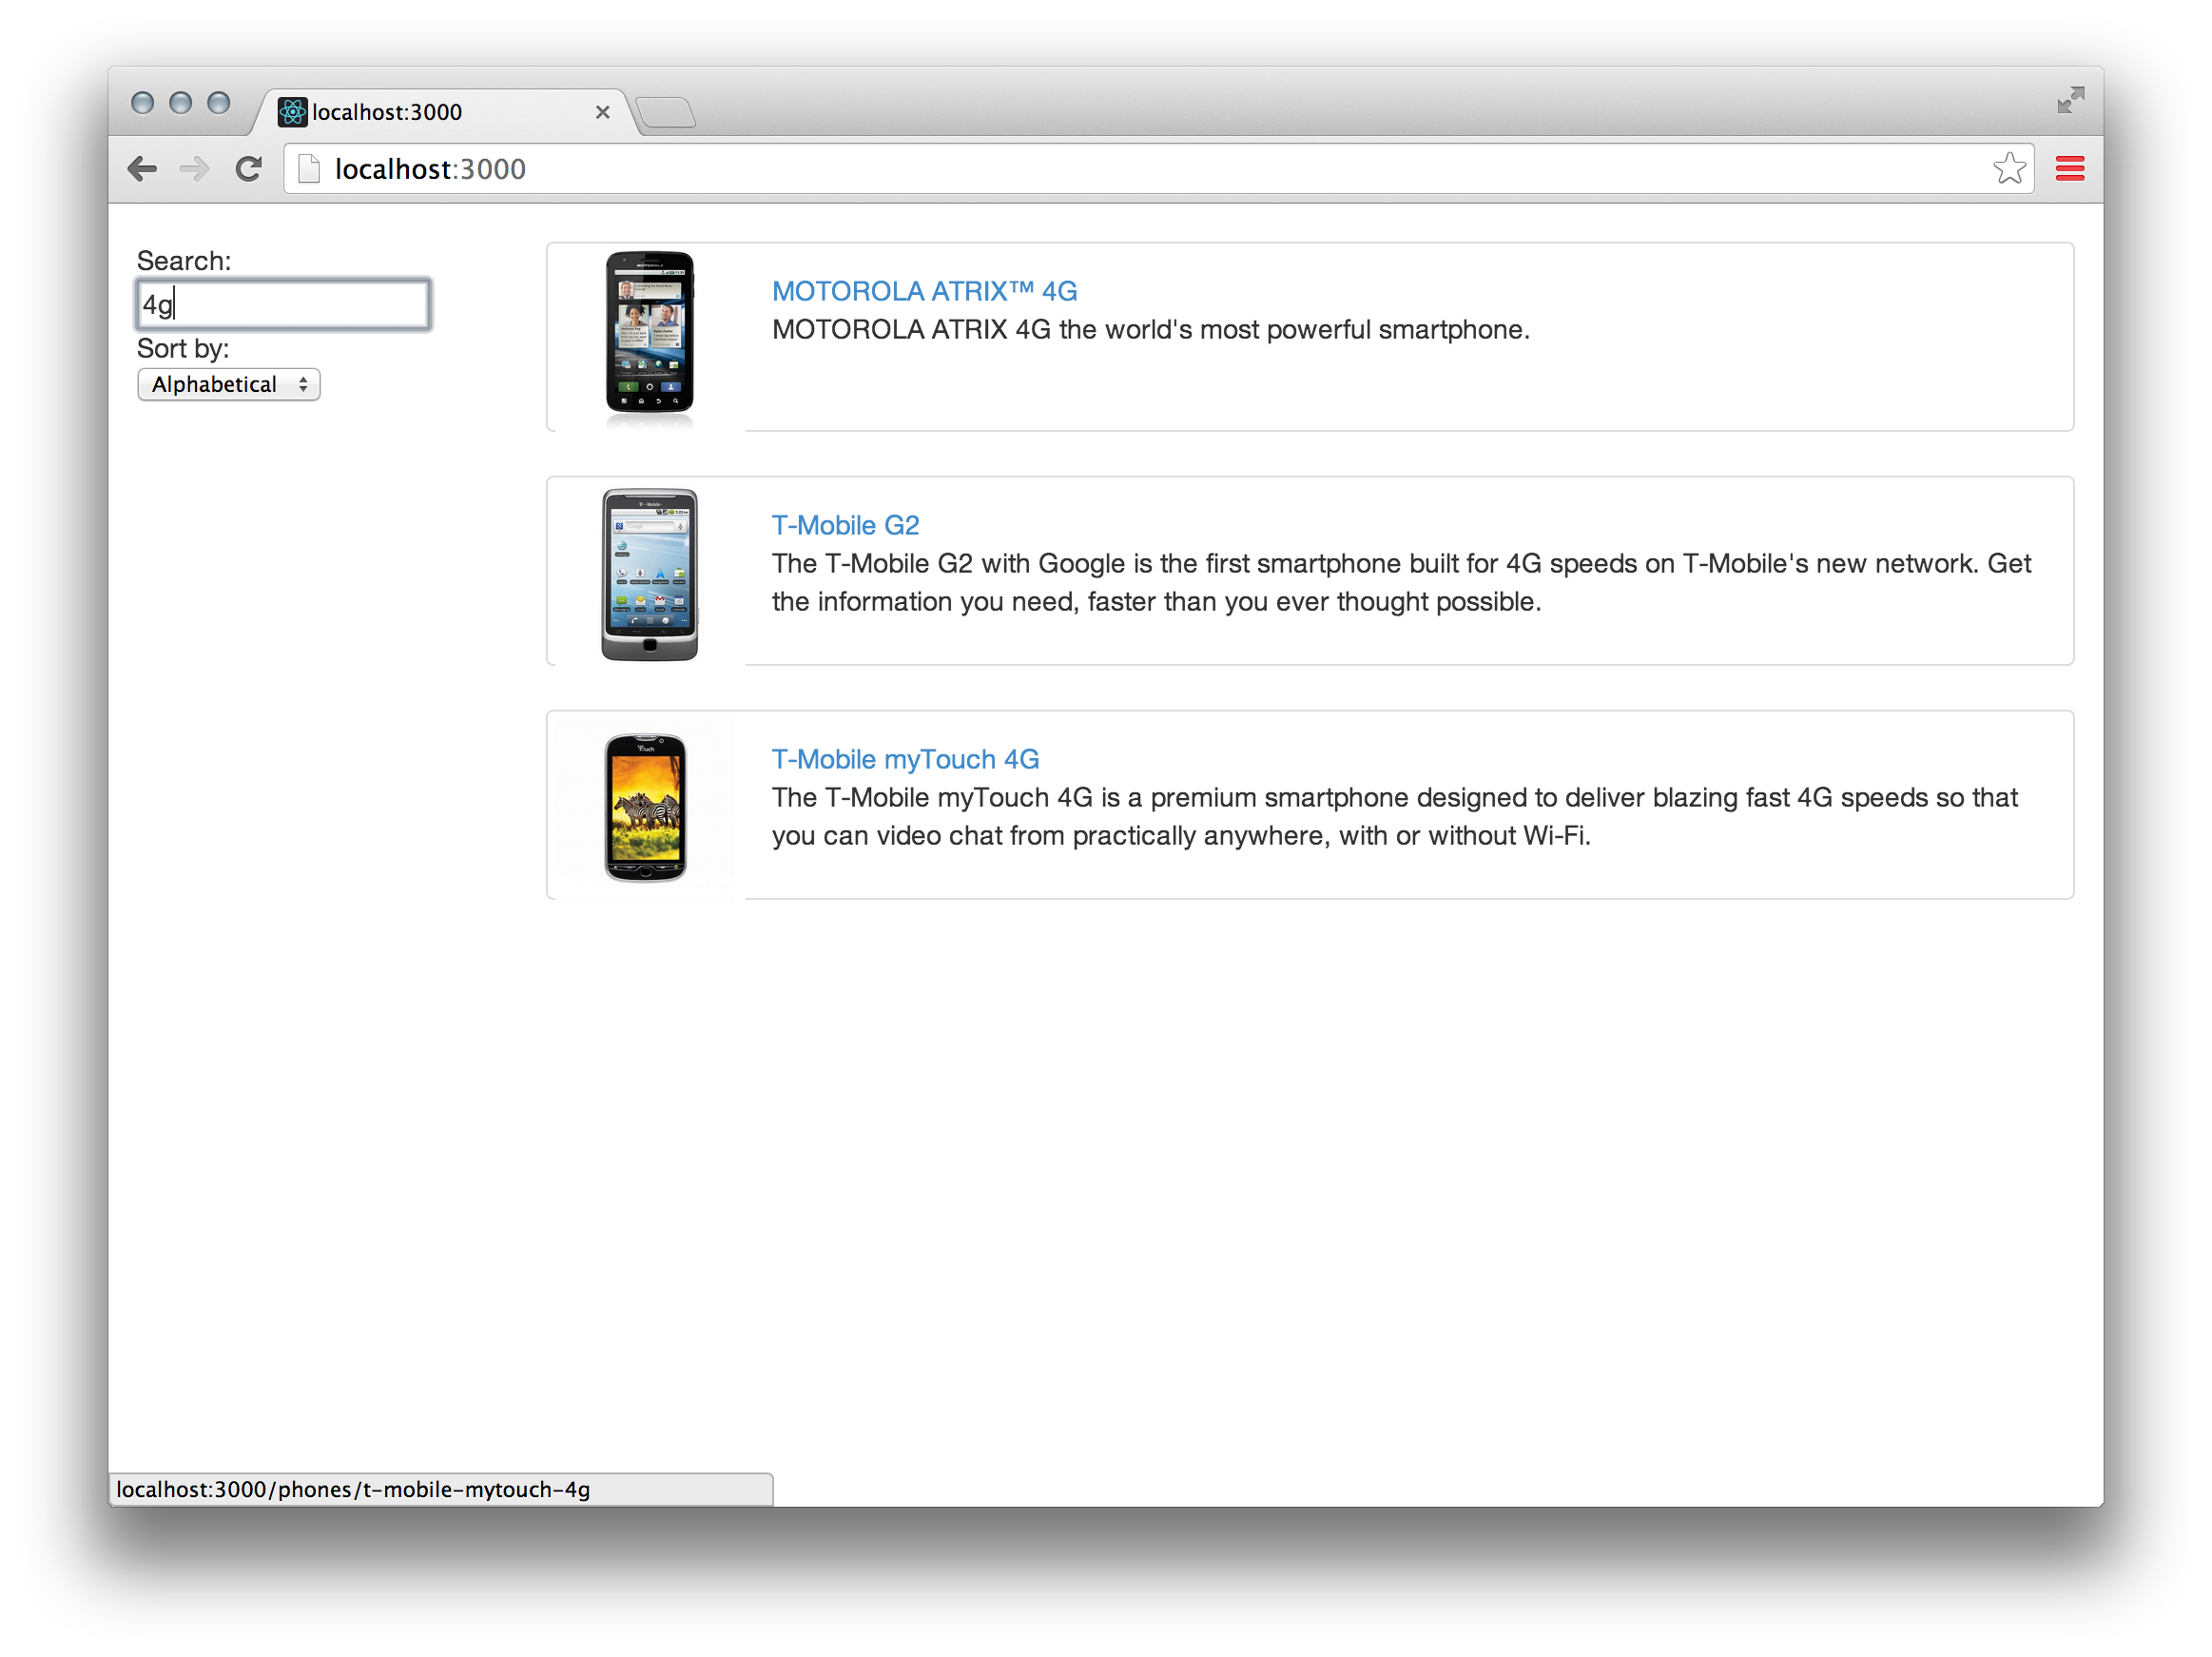
View 1: List view
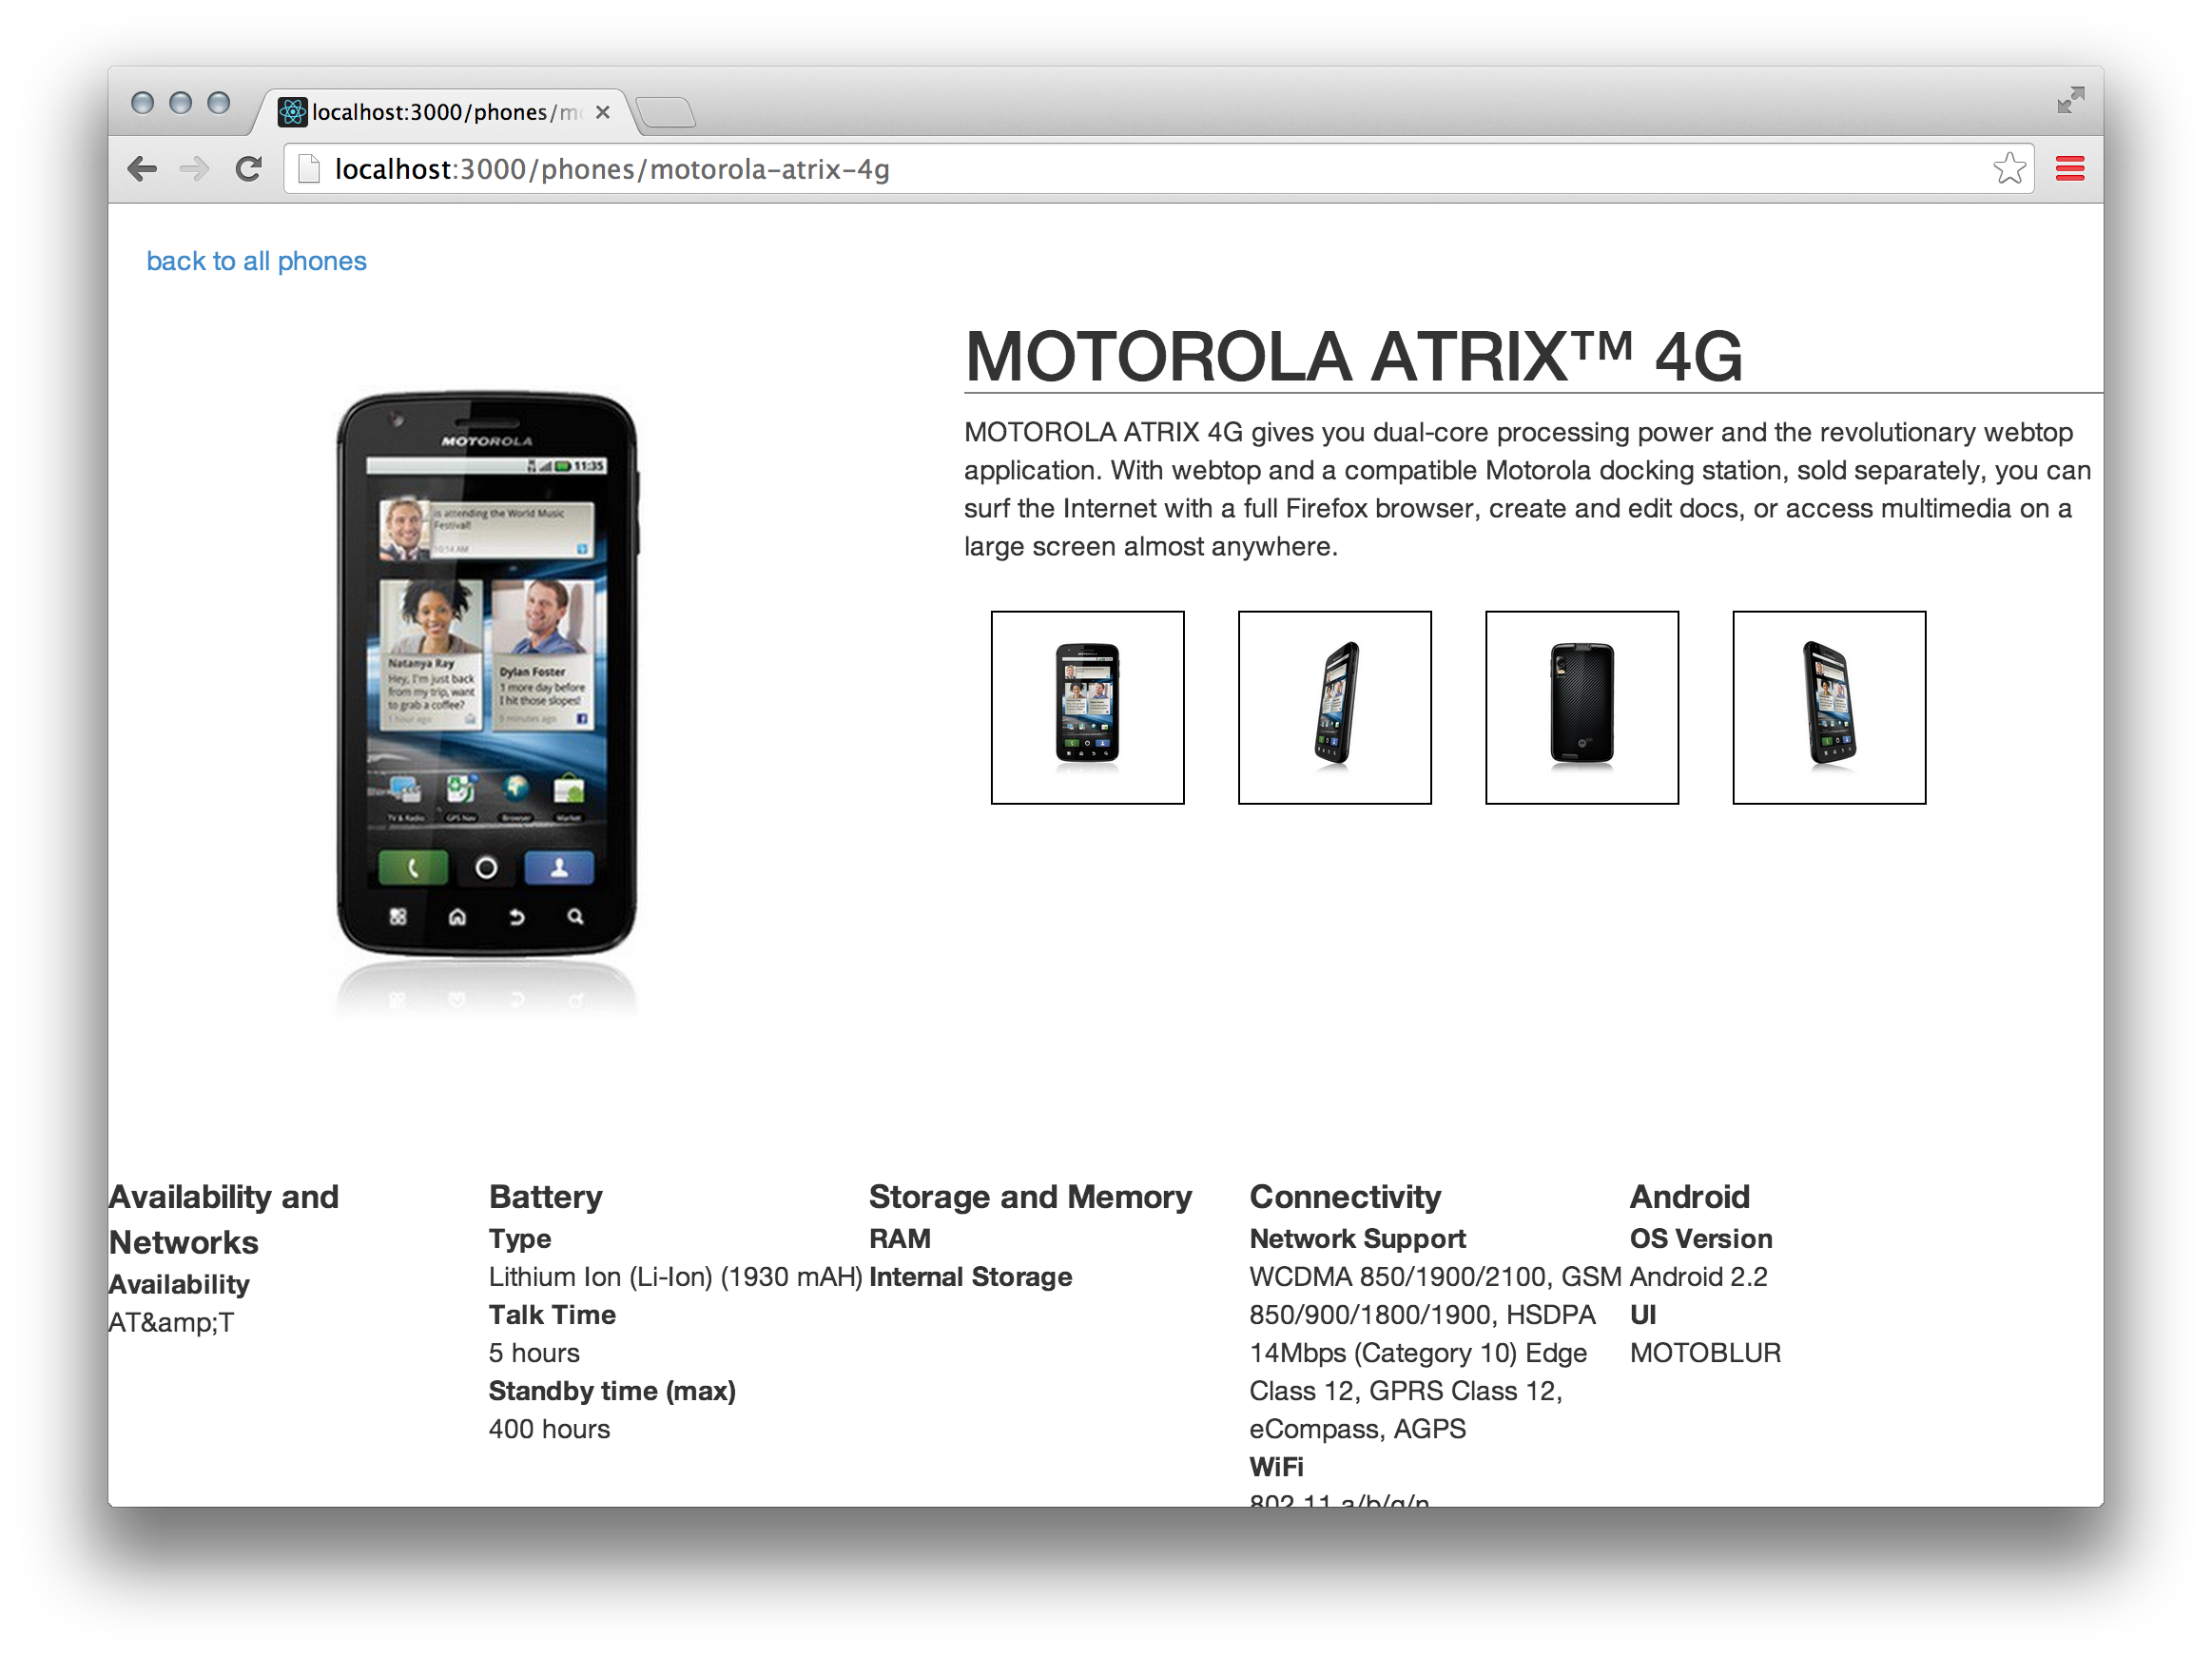
View 2: Detail view
The CSS is copied 1:1 from the original example– Nothing fancy, but we won't dive into it too much here.
Step 1: Getting set up
Clone the git repository:
git clone https://github.com/jgebhardt/react-phonecat.git && cd react-phonecat
Install dependencies via npm:
npm install
Finally, run the server:
npm run start
If you point your browser to http://localhost:3000/, you should now see a nice list of phones, circa 2011.
Step 2: Building a basic app on top of react-quickstart
In contrast to full-blown Model-View-Controller frameworks like Backbone or Angular, React is not as much an MVC framework as it is a set of view abstractions around the "Virtual DOM". In React, you describe what you want your rendered output to look like based on the state of your application at any given point in time. React does not prescribe how you fetch data or do routing– These things are up to you, the developer. Package managers such as npm usually provide modules for most of the common use cases.
For the sake of getting started quickly and focusing on the actual React part of the application, I built this demo on top of Andrey Popp's react-quickstart project, which provides a basic React project, an express-powered file server, routing and some asynchronicity helpers. It also lets us use React's server rendering capabilities, but more on that later.
Let's look at some code!
Open the top-level component, modules/App.js. The react-quickstart project provides some helpful stuff that you won't necessarily find in 'vanilla' React, but I'll try to not let that that confuse you too much.
Let's go line by line:
/**
 * @jsx React.DOM
 */
React ships with an optional syntax called JSX. It lets you specify React components in a way similar to HTML, but all JSX gets transformed into regular JavaScript before it is executed.
For example, <div className="myClass">hi</div> in JSX would be transformed to React.DOM.div({className: 'myClass'}, 'hi').
You could easily write React components in plain JavaScript, but I personally prefer JSX. The @jsx React.DOM annotation tells the build system that this file should be transformed into plain JavaScript prior to bundling and running it.
var React = require('react');
var ReactMount  = require('react/lib/ReactMount');
var ReactRouter = require('react-router-component');

var Pages = ReactRouter.Pages;
var Page = ReactRouter.Page;
var NotFound = ReactRouter.NotFound;
Here we are listing the App's main dependencies: Most importantly, React itself.
ReactRouter is an external module by Andrey Popp that is conveniently included in react-quickstart.
var NotFoundHandler = require('./NotFoundHandler');
var PhonesPage = require('./PhonesPage');
var PhonePage = require('./PhonePage');
These are dependencies on component modules that the app will be using. The router will determine which of these components to display.
ReactMount.allowFullPageRender = true;
React can render just small part of any given site, or it can drive the entire page. This snippet allows React to do the latter.
var App = React.createClass({

  render: function() {
    return (
      <html>
        <head>
          <link rel="stylesheet" href="/assets/css/bootstrap.css" />
          <link rel="stylesheet" href="/assets/css/app.css" />
          <link rel="stylesheet" href="/assets/css/animations.css" />
          <script src="/assets/bundle.js" />
        </head>
        <Pages
          className="App"
          path={this.props.path}>
          <Page path="/" handler={PhonesPage} />
          <Page path="/phones" handler={PhonesPage} />
          <Page path="/phones/:phone" handler={PhonePage} />
          <NotFound handler={NotFoundHandler} />
        </Pages>
      </html>
    );
  }
});
React.createClass is the constructor for any React component. Every React component needs to implement a render method that returns another valid React component. Note that in JSX, standard html primitives such as <html />, <div /> or <a /> are React components, too! This is because React components render to something called the Virtual DOM instead of, well, the actual DOM. Simply speaking, the virtual DOM keeps track of where your render output changes and updates the real DOM only when a modification is needed. This abstraction is what gives React its great out-of-the-box performance. If you are interested in learning more about the diffing algorithm, check out this very illustrative post by @vjeux.
The content of the return statement probably looks familiar: We're linking our CSS files and our JavaScript bundle into the <head> of the page, and the Pages component routes us to the correct Page based on the browser's current URL path.
if (typeof window !== 'undefined') {
  window.onload = function() {
    React.renderComponent(App(), document);
  }
}
Let's not get ahead of ourselves, but... we'll be using React's awesome server rendering capabilities later on to ship pre-rendered markup to the browser on initial page load. This piece simply tells React to take over the page's rendering once we are on the client.
Step 3: Pages for our routes
Great, we have our basic routes set up– Let's look at the pages for each of them.
var NotFoundHandler = React.createClass({

  render: function() {
    return (
      <p>Page not found</p>
    );
  }
});
First off, NotFoundHandler: A very basic React component. It simply renders a paragraph containing a string. This will be shown whenever ReactRouter.Pages does not find an exact match for the URL path.
Next up, PhonesPage:
...
var ReactAsync = require('react-async');
var superagent  = require('superagent');
var PhoneList = require('./PhoneList');

var PhonesPage = React.createClass({
  mixins: [ReactAsync.Mixin],

  getPhonesData: function(cb) {
    superagent.get(
      'http://localhost:3000/api/phones/',
      function(err, res) {
        cb(err, res ? {phones: res.body} : null);
      });
  },

  getInitialStateAsync: function(cb) {
    this.getPhonesData(cb);
  },

  render: function() {
    return <PhoneList phones={this.state.phones} />;
  }
});
Similar to ReactRouter, ReactAsync is another external add-on included in react-quickstart that allows components to fetch some of their state asynchronously. Stay with me– I realize that if you're new to React, this may not make much sense yet, but we'll get there.
We already know that all React components render some output. This output is based on only two things: The component's props and state (both are optional).
State
state is data that is stored inside a component. In traditional MVC framework lingo, "state" is often used synonymously with "model". However, actual state includes more than just the underlying data model. Imagine a drop-down list component: The list items are part of the model' state, the currently selected index is part of the model's state, but whether or not the drop-down is visible is state outside of the model. You can think of this "UI state" as basically anything you wouldn't bother persisting to the server. The React Way™ provides a convenient way to store both model and UI state where it matters most: inside the component.
Props
Alternatively, state (as well as any arbitrary data) can also be passed down from parent components via so-called props. For example, a hypothetical Animal component could take an age and a name prop, and its parent would instantiate it like this:
<Animal age="4" name="fox" />
State or props?
If you are wondering whether state or props is the right place for your data, you may want to check out Pete Hunt's article Thinking in React.
Basically, this is what's happening in our PhonesList component:
When the component is set up, react-async fetches JSON phone data from the server using superagent, which is a module for sending HTTP requests (basically a modular version of jQuery's $.ajax). The result of that API call is mixed into our PhonesPage's state and subsequently passed into a PhoneList component as a prop named phones.
Lastly, the PhonePage component is very similar to PhonesPage, but instead of fetching and rendering a list of phones, it fetches detailed data for a single phone and displays it. We'll come back to this component later.
Step 4: PhoneList
Our phones data has been set up — it's UI building time! Let's take a look at a slightly simplified version of our PhoneList component:
var PhoneList = React.createClass({

  render: function() {
    var phones = this.props.phones.map(function(phone, i){
      return (
        <li className="thumbnail phone-listing" key={i}>
          <Link href={'/phones/' + phone.id} className="thumb">
            <img src={STATIC_ROOT + phone.imageUrl} />
          </Link>
          <Link href={'/phones/' + phone.id}>{phone.name}</Link>
          <p>{phone.snippet}</p>
        </li>
      );
    });

    return (
      <div className="container-fluid">
        <div className="row">
          <div className="col-md-2">
            {/* Sidebar content */}
            <div>Search: <input value="" /></div>
            <div>
              Sort by: <select>
                <option value="name">Alphabetical</option>
                <option value="age">Newest</option>
              </select>
            </div>
          </div>
          <div className="col-md-10">
            {/* Body content */}
            <ul className="phones">
              {phones}
            </ul>
          </div>
        </div>
      </div>
    );
  }
});
Inside render, we first create a list of rendered phone items.
We iterate over the JSON data in this.props.phones, which looks like this...
[
    {
        "age": 0,
        "id": "motorola-xoom-with-wi-fi",
        "imageUrl": "img/phones/motorola-xoom-with-wi-fi.0.jpg",
        "name": "Motorola XOOM\u2122 with Wi-Fi",
        "snippet": "The Next, Next Generation\r\n\r\nExperience the future with Motorola XOOM with Wi-Fi, the world's first tablet powered by Android 3.0 (Honeycomb)."
    },
    {
        "age": 1,
        "id": "motorola-xoom",
        "imageUrl": "img/phones/motorola-xoom.0.jpg",
        "name": "MOTOROLA XOOM\u2122",
        "snippet": "The Next, Next Generation\n\nExperience the future with MOTOROLA XOOM, the world's first tablet powered by Android 3.0 (Honeycomb)."
    },
    ...
]
...and render each data entry into a rendered list item:
  <li className="thumbnail phone-listing" key={i}>
    <Link href={'/phones/' + phone.id} className="thumb">
      <img src={STATIC_ROOT + phone.imageUrl} />
    </Link>
    <Link href={'/phones/' + phone.id}>{phone.name}</Link>
    <p>{phone.snippet}</p>
  </li>
A few things to note:
To specify a component's CSS class in React, you have to use
classNameinstead ofclass. This is because the JSX propclasswould be turned into a JavaScript identifier namedclass– bad news, sinceclassis a reserved word.Whenever you dynamically generate a list of React components (such as via
map), you need to specify a uniquekeyattribute for each item. The key can be anything, as long as it uniquely identifies the item within the list. React uses the key to figure out which items to update if the list changes.Linkis a react-router-aware wrapper around regular anchor links– It ensures that the router client-side transitions to the linked content, rather than causing the browser to request a new page.To specify props in JSX, you can either pass a "double-quoted string" or embed any JavaScript expression inside {curly braces}:
<MyComponent myString="foo" myNum={42} myObj={{foo: 'bar'}} />JSX components without children do not need explicit closing tags– you can use single tags instead, e.g.
<hr />STATIC_ROOTis just a helper that contains a simple path prefix for static assets.
Side note on the Virtual DOM
Let's be clear– when we use e.g. <li> in JSX, we are not referring to an actual DOM element. Instead, we are calling React.DOM.li, which creates a basic component in React's virtual DOM. React will take this virtual li and mount it into the actual DOM. Subsequently, when the virtual li changes, React can compute the minimal set of changes that need to be applied to the actual DOM node. Herein lies the magic of React– Because the actual DOM is slow, "diffing the tree" yields a huge performance boost.
Step 5: Storing input values and handling changes
Looking at the screenshot above, our phone list has two pieces of UI state: The current value of the 'search' input, and whether to show the phone list sorted alphabetically or by age. We're going to store both values in the lists' state object:
  getInitialState: function() {
    return {
      filterValue: '',
      sortBy: 'name'
    };
  },
First, we initialize the component's state using getInitialState.
  handleFilterChange: function(event) {
    this.setState({
      filterValue: event.target.value
    });
  },

  handleSelect: function(event) {
    this.setState({
      sortBy: event.target.selectedOptions[0].value
    });
  },
Next, we add a change event handler for both of our input fields. When the user types into the filter input field, handleFilterChange will update the list's state with the new value. Simply put, a component gets re-rendered every time its state or props change, so the update will cause render() to be called soon after the state has been changed.
Note that neither setState nor render are synchronous, as React may batch them together with other changes.
It's important to use setState for all state updates. If you modified this.state directly, React wouldn't know about the change and therefore not trigger a re-render.
  render: function() {
    ...
    <div>
      Search:
      <input value={this.state.filterValue} onChange={this.handleFilterChange} />
    </div>
    <div>
      Sort by:
      <select onChange={this.handleSelect}>
        <option value="name">Alphabetical</option>
        <option value="age">Newest</option>
      </select>
    </div>
      ...
    }
Finally, we wire up our filter input to consume the value stored in state and wire up our change handlers for both inputs. To add event handlers, simply add a prop named after the respective event type. React will call the handler with a synthetic event object argument, taking care of any cross-browser differences. Here is the official list of supported events.
Step 6: Sorting and Filtering
Now that we've wired up our sort and filter inputs, we should figure out how to actually sort and filter our list of phones based on the list component's state.
function concatValues(obj) {
  return Object.keys(obj).reduce(function(prev, key){
    var val = obj[key];
    return prev + (typeof val === 'object' ? concatValues(val) : val);
  }, '');
}
Firstly, I added a helper to allow full-text search of a phone's nested values. One could use the even hackier JSON.stringify(phone), but the result would include key names.
function sortByAge(a, b) {
  return a.age - b.age;
}

function sortByName(a, b) {
  return a.name > b.name
    ? 1
    : a.name < b.name
      ? -1
      : 0;
}
Secondly, I defined two comparators that we'll pass into JavaScript's plain old sort function.
All that's left to do then is to replace {phones} with a sorted, filtered copy:
  render: function() {
    var sortByFunction = this.state.sortBy === 'age' ? sortByAge : sortByName;
    var filterValue = this.state.filterValue;
    var filteredSortedPhones = this.props.phones.filter(function(phone) {
      return concatValues(phone).toLowerCase().indexOf(filterValue.toLowerCase()) !== -1;
    }).sort(sortByFunction).map(function(phone, i) {
      return (
        <li className="thumbnail phone-listing" key={i}>
          ...
        </li>
      );
    });

    ...

    <ul className="phones">
      {filteredSortedPhones}
    </ul>
In summary, we're using a series of array operators to manipulate our data in a functional style, which I personally find to be quite elegant.
The resulting list of phones is a pure function of only the component's state and props.
Step 7: Filtering Animations
Even though React's core currently doesn't include a lot of animation support, we can make use of the CSSTransitionGroup add-on to animate (dis)appearing list items:
var ReactCSSTransitionGroup = React.addons.CSSTransitionGroup;

...

  <ul className="phones">
    <ReactCSSTransitionGroup transitionName="phone-listing">
      {filteredSortedPhones}
    </ReactCSSTransitionGroup>
  </ul>
This will add CSS classes with -enter, -leave and -active suffixes to any given child element.
All we need to do is add the adapted copy of Angular PhoneCat's animations.css:
.phone-listing-enter,
.phone-listing-leave {
  -webkit-transition: 0.5s linear all;
  -moz-transition: 0.5s linear all;
  -o-transition: 0.5s linear all;
  transition: 0.5s linear all;
}

.phone-listing-enter {
  opacity: 0;
  height: 0;
  overflow: hidden;
}

.phone-listing-enter.phone-listing-enter-active {
  opacity: 1;
  height: 120px;
}

.phone-listing-leave {
  opacity: 1;
  overflow: hidden;
}
Step 8: PhonePage
Now that the phone list page is working, let's look at the PhonePage component, which shows details for a given phone.
PhonePage asynchronously fetches data for a given phone and stores it inside it's own state. The component then passes that data down to a PhoneDetails component via a prop.
Note: A component's lifecycle
Because our router component holds a reference to just one PhonePage component, that component needs to fetch the right data upon initialization and each time the selected phone changes. The router will parse the phone ID contained in the URL down to PhonePage as a prop, so we need to make sure to replace the phone data if the selected phone has changed.
The React component API offers a set of lifecycle hooks that allow us to perform work in certain critical places.
  componentWillReceiveProps: function(nextProps) {
    if (this.props.phone !== nextProps.phone) {
      this.getPhoneInfo(nextProps.phone, function(err, info) {
        if (err) {
          throw err;
        }
        this.setState(info);
      }.bind(this));
    }
  },
To re-fetch the data when the selected phone changes, I added a componentWillReceiveProps handler with a conditional on the phone prop. The handler will be called whenever the component's props are about to change, giving us the chance to compare the current props with nextProps and go back to the server when necessary.
PhoneDetails renders various values of the phone prop into markup, similar to PhoneList. There are two interesting parts that I'd like to highlight.
The Checkmark component
I created a very simple Checkmark component that renders ✓ or ✘ depending on a truthy checked prop:
var Checkmark = React.createClass({

  // default value in case no props are specified
  // optional, but good practice
  getDefaultProps: function() {
    return {
      checked: false
    };
  },

  render: function() {
    return <span>{this.props.checked ? '\u2713' : '\u2718'}</span>;
  }
});
Checkmark is a nice, compact example of how React components encourage code re-use through composition – to use it, simply pass a value to a Checkmark component:
<dd><Checkmark checked={phone.connectivity.infrared} /></dd>
Selecting the main image
When the user clicks on one of the thumbnail images, the main image should change accordingly. To do that, we'll store the URL of the currently selected image in state and initialize it with the URL of the phone's first image:
  getInitialState: function() {
    return {
      activeImageURL: this.props.phone ? (STATIC_ROOT + this.props.phone.images[0]) : ''
    };
  },
We then provide a click handler that takes the URL of the clicked image as an argument:
  handleThumbClick: function(activeURL, event) {
    this.setState({
      activeImageURL: activeURL
    });
  },
For each thumb, we bind its URL to handleThumbClick and pass it into the onClick prop:
  var phoneThumbs = phone.images.map(function(image, i) {
    var imageURL = STATIC_ROOT + image;
    return (
      <li key={i} onClick={this.handleThumbClick.bind(this, imageURL)}>
        <img src={imageURL} />
      </li>
    );
  }.bind(this));
Rendering the main image is the easy part: state will always contain the URL of the currently selected image, so we can simply pass it in:
  ...
  <div className="phone-images">
    <img className="phone" src={this.state.activeImageURL}/>
  </div>
  ...
Remember: render is automatically triggered whenever props or state have changed.
(tangential) Step 9: A basic phone API
So far we've assumed that the server magically returns results to our AJAX calls. Instead of just requesting static JSON files, let's build a tiny phone API in express.
Take a look at server.js:
function returnJSONFile(req, res, filePath) {
  fs.readFile(filePath, 'utf8', function (err, data) {
    if (err) {
      res.status(404).send('Not found');
    }
    data = JSON.parse(data);
    res.send(data);
  });
}
returnJSONFile reads a file and returns it to the client.
var api = express()
  .get('/phones/:phone', function(req, res) {
    var phone = req.params.phone;
    var path = './data/phones/' + phone + '.json';
    returnJSONFile(req, res, path);
  })
  .get('/phones', function(req, res) {
    returnJSONFile(req, res, './data/phones/phones.json');
  });
Here we define a route for the list of phones and individual phone details, passing the correct path to returnJSONFile.
var app = express();

app
  .use('/assets', express.static(path.join(__dirname, 'assets')))
  .use(express.favicon("assets/img/favicon.ico"))
  .use('/api', api)
  .listen(3000, function() {
    console.log('Point your browser at http://localhost:3000');
  });
Finally, we configure and start the express app. It will serve images, CSS files and our bundled JavaScript file from the /assets directory, while the API responds to calls to /api/phones/.
Bonus Step 10: Server rendering
Why server rendering?
Client-side web applications are great– They allow us to build snappy, highly interactive experiences. However, pure client-side apps face a few problems:
Their content cannot be crawled and indexed by search engines, which is bad for SEO
The app will be useless in browsers without JavaScript support
For these reasons, pages are traditionally pre-rendered on the server using e.g. PHP, Ruby or Python. The client-side code then needs to be hooked up to pre-rendered content to provide interactivity. In many cases, this means that one needs to maintain several versions of code that does essentially the same thing.
React provides a simple approach to this problem: It is an isomorphic JavaScript framework, which means that it can run the same exact view code on both the server and the client. The server will pre-render your page to html using React, then ship it down to the browser, where a client-side instance of React hooks itself into the markup and continues where the server left off. This makes the page searchable and, most importantly for your users, time to interaction is reduced significantly.
Server rendering in React
React provides multiple [methods for rendering components]. The most common one is renderComponent, which renders the component into the browser DOM:
React.renderComponent(<MyComponent />, document.body);
To render a page on the server, we simply replace that call with renderComponentToStaticMarkup:
var markup = renderComponentToStaticMarkup(MyComponent);
We send the result to the client, where renderComponent is subsequently called to continue rendering interactive updates to the page.
Since react-async provides a render wrapper called renderComponentToStringWithAsyncState that returns when the asynchronous rendering has finished– That way the initial markup already contains the phone data that we'd otherwise need to fetch via AJAX whenever the page os bootstrapped.
function renderApp(req, res, next) {
  var path = url.parse(req.url).pathname;
  var app = App({path: path});
  ReactAsync.renderComponentToStringWithAsyncState(app, function(err, markup) {
    if (err) {
      return next(err);
    }
    res.send(markup);
  });
}

...

var app = express()
  .use('/api', api)
  .use(renderApp)
  .listen(3000, function() {
    console.log('Point your browser at http://localhost:3000');
  });
As you can see, enabling server-rendering is as trivial as adding a piece of express middleware.
Side note: “This framework vs. That framework”
Lines of Code considered harmful
As some commenters on the original HN thread have pointed out, Backbone is less opinionated than Angular, and the added flexibility comes at the expense of requiring more code to do the same thing for certain scenarios.
The PhoneCat app was conceived specifically to teach and showcase Angular features– it's not surprising that a lot of the challenges of this specific application are solved in a few lines.
Lines of Code are a notoriously bad proxy metric for developer productivity, product complexity etc. I invite the skeptics to study the corresponding Wikipedia article for some pointers regarding the pros and cons of using LOCs.
Just to show that I'm not fabricating some sort of cop-out, I ran the numbers for both the Angular and React versions of PhoneCat using cloc:
 ~/react-phonecat$ cloc --by-file modules
       8 text files.
       8 unique files.
       0 files ignored.

http://cloc.sourceforge.net v 1.60  T=0.03 s (284.2 files/s, 14851.6 lines/s)
----------------------------------------------------------------------------------------
File                                      blank        comment           code
----------------------------------------------------------------------------------------
modules/PhoneDetails.js                      12              3            146
modules/PhoneList.js                         10              3             80
modules/App.js                                8              3             38
modules/PhonePage.js                          8              3             37
modules/PhonesPage.js                         6              3             21
modules/Checkmark.js                          5              3             12
modules/NotFoundHandler.js                    4              3              9
modules/StaticRoot.js                         0              0              1
----------------------------------------------------------------------------------------
SUM:                                         53             21            344
----------------------------------------------------------------------------------------
Note: The Angular version simply serves static files, so I'm not counting code in server.js.
~/angular-phonecat$ cloc --by-file js partials
       9 text files.
       9 unique files.
       1 file ignored.

http://cloc.sourceforge.net v 1.60  T=0.03 s (279.8 files/s, 9110.1 lines/s)
-----------------------------------------------------------------------------------
File                                      blank        comment           code
-----------------------------------------------------------------------------------
partials/phone-detail.html                    4              0            114
js/animations.js                              8              0             44
js/app.js                                     4              1             23
partials/phone-list.html                      4              2             22
js/controllers.js                             5              1             16
js/Checkmark.js                               6              3             12
js/services.js                                3              1              8
js/filters.js                                 2              1              6
js/directives.js                              1              1              1
-----------------------------------------------------------------------------------
SUM:                                         37             10            246
-----------------------------------------------------------------------------------
For the sake of fairness, I counted HTML templates / markup. In my opinion, they are as much part of the view as its corresponding "View Controllers", and the markup specification for the virtual DOM forms the core of most React components.
Our React version contains 40% more lines of code. I'm certain that both the Angular and React versions could have been written more or less succinctly, but succinctness is a non-goal. For example, Checkmark.js is a 12-line wrapper around condition ? ✓ : ✘, but those 12 lines are easy to read, and they encapsulate the concept inside a React component, which makes it composable and infinitely re-usable.
Here's a rapidly brainstormed list of possibly superior criteria for JS framework selection
- Learning curve: How high? How steep?
- Productivity: Both initially and over time
- Pre-existing developer familiarity with underlying concepts
- Ease of integration with tools and legacy systems
- Performance considerations
- Re-usability of client code
- Does it encourage high cohesion & low coupling?
- Testability: Unit, Behavioral, Integration, Visual regressions testing
- Server rendering capabilities
- Maintenance burden
- API stability
True to the introductory quote from Paul Graham's essay Beating the Averages, I invite you to not trust my word and go see for yourself. Give frameworks X, Y, Z and maybe even React a try. See what works best for you. I'd love to hear how it went: I'm @jonasgebhardt on twitter. You can also comment below.